Wednesday, September 26, 2012

Preschool Week 3: Science Lab!

Monday with Arielle

Opening Activity:  Decorate craft stick magnet.  Make marshmallow molecules!

Circle Time:   
  • Date/Time/Weather
  • Story:  "The Magic School Bus & the Science Fair"
  • Singing Time
Snack:  cheese, crackers, fruit

Wiggle Time:  “Branches of Science”.  Look for bugs, plants, and rocks, clouds, sun, and moon; discuss different sciences. 

Lesson:  Can we be scientists? What is a hypothesis?  Experiment – is it magnetic?


Craft:  Make an atom by gluing pom-pom protons, neutrons, and electrons on paper.  Which element will you make?


Wednesday with Naomi

Opening Activity:  Puzzles and Dot to Dot coloring

Circle Time: 
  • Date/Time/Weather
  • Story- "The Very Hungry Caterpillar" (Talk about how Science helps us to know that caterpillars turn into butterflies. Talk about our own observations of our pet Praying Mantis, Joey. Discuss the way Joey's eyes change colors, the way he camouflages and hunts, the way he eats, the habitat he prefers etc. Now that we have observed Joey for 3 weeks, we will let him go back into the wild!)
  • Music Dice (Roll giant dice with song names on them, then sing the songs)

Snack: Mini Apple Pies (Peel and chop apples, dust them with brown sugar and cinnamon, roll them into store bought crescent rolls, brush melted butter on top and sprinkle with cinnamon sugar mixture, and then bake.) Talk about how the apples start out hard but then get soft. Talk about the dough being soft and squishy and then becoming more firm and crispy. Make a hypothesis as to why this happens.

Wiggle Time: How will our bodies react when we…? Pick a motion and then hypothesize what will happen to your body when you do it. (i.e. What will happen to my body when I run around in circles 10 times? What will happen to my heart if I jump up and down 20 times?)

Lesson: Remind children what a hypothesis is and what a scientist does. Talk to them about the importance of experimenting – start Freeze & Frost experiment

Lesson Application Activity:

Science Experiments! (All Experiments were copied verbatim from A+'s "Science Projects: Physics Tricks" a workbook that I found in the Target dollar bins! They are NOT my own!)

1. Magic Balloon 


What you Need:
  • Small water or juice bottle, empty and rinsed out (The top should be small enough that you can stretch the opening of a balloon over it.)
  • Latex balloon (new)
  • 4 tablespoons vinegar
  • 2 tablespoons baking soda
Optional: a small funnel is helpful for getting the baking soda into the balloon.

Result Timing:
5 minutes

Directions:
  1. Pour vinegar into the bottle
  2. Using a small funnel, or a piece of paper shaped into a cone, spoon the baking soda into the balloon.
  3. Holding the balloon so that the baking soda doesn't tip into the bottle, stretch the opening of the balloon to fit over the neck of the bottle.
  4. Slowly straighten out the balloon and tip it upside down so that the baking soda falls into the vinegar in the bottle. What happens?
  5. Draw pictures of the balloon and bottle as they looked before and after the experiment.
Explanation:
When you mix substances like vinegar and baking soda, you cause a chemical reaction. The chemical reaction changes the original ingredients in some way. In this case, vinegar and baking soda react to each other and produce carbon dioxide. Although carbon dioxide is an invisible gas, we can spot in in two stages of this experiment: First, when the baking soda is dumped into the vinegar, carbon dioxide is produced and it makes the vinegar bubble. Second, the carbon dioxide rises through the vinegar into the air where it's caught in the balloon. The reaction should produce enough carbon dioxide to at least partially blow up the balloon.

2. Invisible Skin 


What you Need:
  • 4-6 drops of vegetable oil
  • Water faucet
  • Liquid or bar soap for hand washing

Result Timing:
10 minutes

Directions:
  1. Holding your hands over the sink, put about 4-6 drops of oil into one hand and then rub your hands together.
  2. Turn the cold water on and let the water run over your hands. What happens when the water touches the coating of oil on your hands? Try to remember what your hands look like so that after they are clean again you can draw how the water looked on your hands.
  3. Rub some soap into your hands and put them back in the water. What happens when the water touches your clean hands?
Explanation:
Water is made of extremely tiny pieces called molecules. The molecules of water stick together very tightly. The molecules that make up oil are arranged differently from water molecules, so when they're put together, the oil molecules won't easily dissolve into the water. You probably noticed that the water rolled off your oily hands rather than washing the oil off with it-the water molecules stick to other water molecules rather than grabbing onto the oil molecules.


3. Crashing Colors 


What you Need:
  • Cereal bowl
  • Skim milk
  • Red, Blue, and Yellow liquid food coloring. (Gel food coloring won't work in this experiment)
  • 1 tablespoon of liquid dish detergent

Result Timing:
5 minutes

Directions:
  1. Fill the cereal bowl with skim milk. (not quite to the top.)
  2. Gently add a few drops of red color into the milk in a small spot at the edge of the dish. Repeat with blue and yellow, moving around the dish's edge so that each color is as far from the other two colors as you can make it. Do not stir the milk or jiggle the bowl!
  3. Slowly pour a little detergent into the middle of the bowl. Make predictions as to what colors will appear when the primary colors are mixed. Draw and color what you see.
Explanation:
Just like water, milk is made of molecules, tiny pieces that stick together. They stick so closely that when you put in food coloring, the food coloring (for the most part) just sits on top of the milk. Scientists call this trick surface tension-the molecules stick together as if there is an invisible skin across the top of the milk. When you add detergent to the milk, it pulls the milk molecules apart so that surface tension is weakened. The milk and detergent molecules move around, and so does the food coloring! Where the colors mix, you may see a little green, orange, or purple.
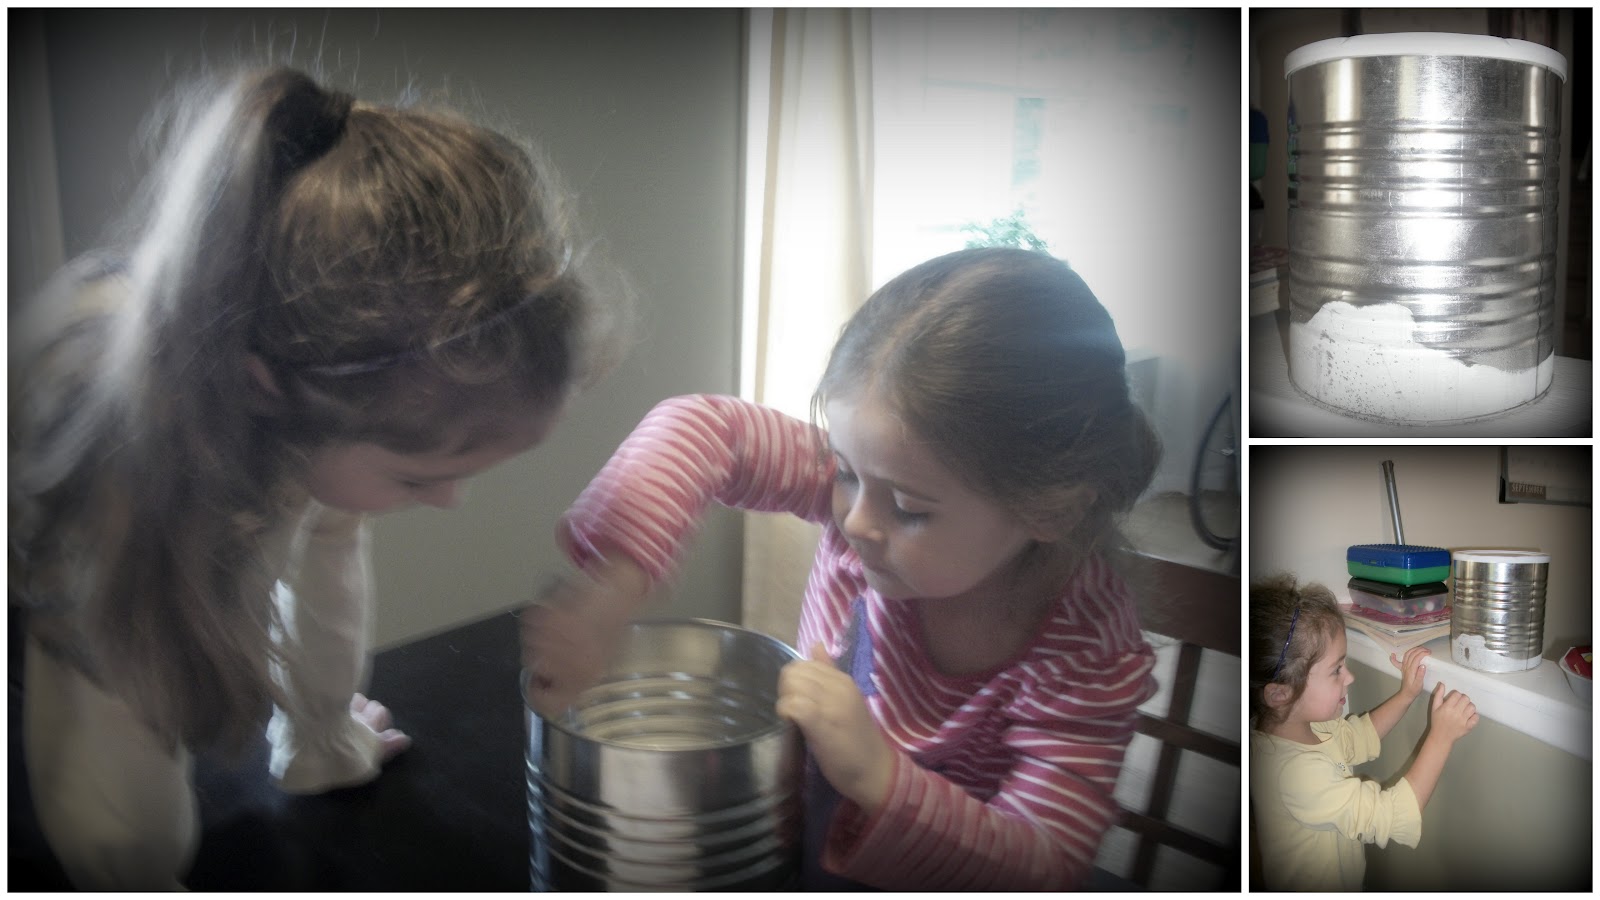
4. Freeze & Frost 


What you Need:
  • Metal coffee can with plastic lid (empty, clean and dry, or a small stainless steel mixing bowl, plastic wrap and a runner band.)
  • 8-10 ice cubes
  • 1/2 cup of salt
  • Spoon

Result Timing:
30 minutes

Directions:
  1. Put the ice cubes in the coffee can.
  2. Pour the salt on top of the ice cubes and then use the spoon to stir the salt and ice a few times.
  3. Put a lid on top of the container, or cover it tightly with plastic wrap and a rubber band.
  4. Let the can sit on a table or counter. Check back in 10 minutes and again at 20 and 30 minutes. Do you see anything happening on the outside of the container? Write down what you observe every 10 minutes.
Explanation:
You should see frost forming on the outside of the container, starting at the bottom, within 10-20 minutes. If the ice cubes are on the inside of the container, why did frost form on the outside of the container?

It's because of a process called condensation. Even when there's not a cloud in the sky, there is water we can't see - water vapor - in the air around us. As the temperature cools, some of that invisible water vapor changes into liquid water that we can see and touch. In our experiment, the ice causes the sides of the container to become much cooler than the air around the container. This cooling caused the water vapor to change into liquid water where it touched the container and then to freeze, forming a coating of frost.
 

5. Homework: Growing Gummy Bear (Teaches Osmosis)

 
Friday Field Trip

Visit your local Children's Museum. There are often FREE days at the museum or Groupons and other offers that can make it less expensive. Be sure to invite some friends!


Tuesday, September 25, 2012

Preschool Week 2: Fun with Fall


Monday with Arielle-

  • Opening Activity: Color a tree trunk. Cut out leaves. Drop handful of paper leaves on paper; write down total number that land on the tree and how many of each color. 
  • Circle Time: 
  1. Date/Time/Weather
  2. Story – “The Busy Little Squirrel”
  3. Songs about Fall.
  • Snack: Food we get from trees (nuts, apples, bananas, etc.)
  • Wiggle Time: I’m a Squirrel (pretend you are an animal getting ready for winter, gather food and bedding) I’m a Leaf (pretend to be a seed, tree, leaf, then fall from the tree)
  • Lesson: The Four Seasons. Show pictures of a tree. Talk about the leaves on the tree for each season. Explain difference between deciduous and coniferous plants. Eating Leaves. Discuss foods that we eat that are leaves - lettuce, cabbage, spinach, kale, cilantro, basil, oregano, parsley, mint, bay leaf! Smell different herbs. 
  • Craft: Leaf People - Have the children glue a leaf on a piece of paper and draw legs and arms then add googly eyes


Wednesday with Naomi-


  • Opening Activity: Start color changing leaf science project found HERE. Bead pipe cleaners by color (i.e. red beads go on red pipe cleaner, yellow beads on yellow pipe cleaner, orange beads on orange pipe cleaner.) 
  • Circle Time: 
  1. Date/Time/Weather
  2. Story “The Seasons of Arnold’s Apple Tree”.
  3. Song names written on a leaf. Pick one leaf at a time and sing the song that is on it.
  • Snack: My little apple tree seasons snack (found HERE via Pinterest) 

  • Wiggle Time: Nature walk to find signs of Fall (Bring a nature bag) 
  • Lesson: Why do leaves change color. (Information found HERE) Don't forget to check on science experiment!
  • Craft: Take a branch from the nature walk, glue it on canvas, use buttons for fall leaves! 


Friday Field Trip-

Take a Hike through Lyman Woods with any friends who would like to join you and make sure you look for signs of fall.


Friday, September 21, 2012

The "I" Date


I know it's been a long time coming, but Kevin and I finally got around to our "I" date! We found it nearly Impossible to find a babysitter, so we went the dinner and movie route Instead and watched all 4 Indiana Jones movies while we made homemade Ice cream in Ziploc bags! Shaking the Ice got a little Irritating on my already cold hands, but when it was finished the Ice cream was Irresistibly delicious and totally worth it!

Next on the agenda: The "J" Date! Let us know if you have any good Ideas!

Thursday, September 20, 2012

Preschool Week 1: Music and Dance

Monday with Arielle-
  • Opening Activity: Cutting activity with music notes and file folder puzzles with letters and numbers.
  • Circle Time: 
  1. Date/Time/Weather
  2. Story "Ah, Music" by Aliki 
  3. Singing time with shakers (Easter eggs with beans inside)
  • Snack: Applesauce, graham crackers, yogurt, water
  • Wiggle Time: Learn dance moves to different styles of music.
  • Lesson: Discuss types of instruments and how they are played (string, wind, percussion) and how they sound. Sort instruments into groups.
  • Craft: Make a drum out of old containers and practice tapping our rhythms.
Wednesday with Naomi-
  • Opening Activity: Legos with sight words written on them built into word towers and a cutting activity. (The girls had a blast with the Legos but were not very keen on building with the sight words. They will need more practice with their sight words before we can try something like this again. Also, we picked up our preschool cutting books from the dollar store and the dollar spot at Target.)
  • Circle Time: 
  1. Date/Time/Weather
  2. Story "How Can You Dance?" by Rick Walton and Ana Lopez-Escriva
  3. Singing Time with Pipe Chimes
Click on the words "Pipe Chimes" above for a tutorial on making the pipes. It cost me $10 for the pipe cutter (I bought a copper pipe cutter for $20 cheaper than a steal pipe cutter) and $4 for the pipes. I had the board, white paint, hooks, twine, and drill on hand and my husband put the music notes on with a Sharpie.

  • Snack: Oreo cookies and chocolate frosting made into music notes, and milk.

  • Wiggle Time: Learn the Hula dance "Puka Pants" with the accompaniment of the ukulele, and then play "Just Dance" on the Nintendo Wii.

  • Lesson: Music can be made anywhere! Explore the house and see what items can be made into musical instruments. (Their favorite instruments were clappers made from flip flops, harmonicas made from saran wrap and combs, and drums made from pots and forks!)
  • Craft: Bean Shaker Maracas

Friday Field Trip-

Go to a local high school and watch the marching band practice. Talk about all the different rhythms and instruments.

How we set up our Preschool

As I mentioned before, after our old preschool teacher moved, we realized we couldn't really afford to put out daughter in school anywhere else. That epiphany made me also realized I would have to do preschool by myself, and thus, would have to consider my personality and how it would play into my daughter's education.

After a bit of reflection, I  came to the conclusion that I would NOT be able to keep myself motivated to teach on a structured schedule without at least one other student and another mom to remind me of my responsibilities. So I asked my good friend Arielle if she wanted to co-teach our daughters with me. She was more than happy to join the effort and before long we had a working plan. This is what we decided:
  • We would have weekly themes to base our lessons on.
  • Preschool would be 3 hours long
  • Arielle would teach Mondays and I would teach Wednesdays
  • The daily structure of preschool would be the same at both our houses to maintain continuity and establish firm rules
  • On Fridays we would get together and invite other moms on a field trip based on the weekly theme
This is how we structured our days:


We also printed off a schedule for the kids to look at during preschool. We found that if they didn't know what was coming next, they would keep asking when playtime was for the rest of the day. So we made them their own schedule where they could check off each activity as we finished.


We have only been teaching for two weeks, but so far everything is working out great. I will be posting our lesson plans at the end of each week if you are interested in trying preschool on your own. I figure if we've already done all the work to organize it, we might as well share! :)

Wednesday, September 19, 2012

Where I've been, What I've been doing, and What's gonna happen now!

So, you may have noticed that I've been a little MIA these days. Where have I been you might ask? Well...


I spent a large portion of my summer in Utah for the Uda family reunion. And while I was there, I also got to spend time with Kevin's family in Kaysville and Idaho as well. We were there for over a month, and when I got back...


I had to spend some serious time getting this one potty trained. She was a tough one to figure out, but eventually we learned that as long as it was NEVER our idea, she would use the toilet. She still has occasional accidents (mostly when she is mad at me) but otherwise is doing quite well!


After all that potty training I had to prepare for my seventh anniversary, which involved a massive effort to rid our fire pit of wasps! But that is not all, I also helped my husband build the Adirondack chairs you see (complements of Ana-white.com) and I hacked away all the overgrowth in our yard that the previous renters left behind!


Then I got to work redoing some old patio furniture we were given. I just used spray paint on the table and chairs, then used the old padding from our window seat at our last place to make cushions. The outdoor fabric was from Joann's and thanks to their 50% off coupons, I saved $45 dollars on it! Woohoo! Total cost: $60


I've also been running... a lot! I'm training for a half marathon in October, but was able to do two 5k's with my friends this month in preparation for my bigger race. We had so much fun together, beating old records and rolling in the mud :)


Oh yeah! and remember our super awesome, super affordable preschool teacher that decided to move at the end of last year? Well, we couldn't find anyone to replace her (as she is irreplaceable) so I decided to do preschool myself. That means I also spent a lot of time figuring it out and prepping my house for it. I made a music station and a fabric map of the USA (more to come on those later) and my husband made individual desks for the girls in my class.

And before you think I would try something like this alone, let me just say that I was able to convince my amazing friend Arielle to join me in the effort! She teaches Mondays, I teach Wednesdays, and on Fridays we combine for a field trip that has to do with the weekly theme. 

Long story short, I am back now and will mostly be posting about our preschool adventures. But until then...


Here is a little picture of Brooklyn on her first day back to school. She was super excited and it was fun interviewing her for the second time. If you want to compare her answers to last year, you can check them out HERE!